 Figure 1
[ See also the new version of this article, The Perfect Armor (Improved). ]
Suppose you were drawing up specifications for the perfect armor. It would be easy to make from inexpensive materials using commonly available tools. It would be light, strong and rustproof. It would look good. And, of course, it would be period.
Hardened leather, also known as courbouilli, meets all of those requirements. Since discovering how easy it is to make, I have used it to make forearm and elbow protectors, greaves, a half gauntlet, body armor, and edging for my shield. I even made a hardened leather hockey cup, on the theory that the usual white plastic version was the most strikingly mundane item in my armor bag.
In this essay, I will describe how to make several pieces of armor out of hardened leather: a bazuband (a medieval Islamic forearm and elbow protector), a klibanion (Byzantine body armor), a gauntlet and a basket hilt. The techniques described can be applied to a wide variety of other pieces.
To start, you need some leather. It should be vegetable tanned leather rather than chrome tanned leather, and undyed. Chrome tanned, which is the most common modern variety, can usually be recognized by the grey color of the cut edge (unless the edge has been dyed). Vegetable tanned leather is used for carving, making belts and similar projects; it is often described as saddle skirting. Its color, before you harden it, is a light tan.
The thickness of leather is defined in ounces per square foot. One ounce corresponds to a thickness of 1/64"; what is actually measured is usually thickness rather than weight. Ideally you should use at least 12 or 13 ounce leather. Leather as light as 8 or 9 ounces can be used for armor, at least over places that are not too vulnerable; if you make your bazuband out of something that light, use two thicknesses over the elbow. The klibanion is made of overlapping lamellae, giving a total thickness of about twice the thickness of a single layer of leather, so 8 ounce provides at least minimal protection.
Before you start making hardened leather armor, let me give you three warnings. The first is that, although beeswax is attractive, pleasant smelling stuff, people who do not make armor and do share your kitchen may object to finding hardened drops of it scattered over the floor, stove, and countertops. The problem can be minimized by being careful with the molten wax. If you are not good at being careful, you will want to know that hardened wax is easier to remove if you use something soaked in hot water.
The second warning is that wax can burn-which is why it is used to make candles. I have never had beeswax catch fire on me when I was using it to harden leather, but I expect it could happen if you got it too hot. I have no experience with paraffin or other waxes that you might use instead. Be careful, and keep a fire extinguisher nearby.
My final warning is to remind you that the bag that separates your inside from your outside is made of leather. Any tool designed to cut leather is also designed to cut you, so be careful. As Kipling put it in "The Wrong Thing," "Do your work with your heart's blood, but no need to let it show."
Figure 1
To Make a Bazuband
Figure 1 shows what a simple bazuband looks like; Figure 2 shows the piece of leather you will use. The measurements are the circumference of the wrist (a), the maximum circumference of the forearm (b) and the distance from the wrist to the crease that divides the forearm from the upper arm (c). I have given the measurements of the piece for my arm as an example.
Cut out the piece, fill a pot with cold water from the tap, and put the leather in to soak; if you do not have a pot big enough, use the sink or bathtub. After the leather has soaked for half an hour or so it gets flexible and slightly stretchy. If you are making something that requires a good deal of stretching, such as a bazuband or greave, let the leather soak overnight, then take it out, cover it with a damp towel, and leave it for eight hours or so.
If you were simply making a forearm guard, all you would have to do to shape it would be wrap it around your arm (with padding), or around anything else about the same shape and size, and let it dry. A bazuband is a little trickier because of the part that covers the elbow, which is curved like part of a sphere. To make that, you have to stretch the central portion of the leather that goes over the elbow-the shaded area on Figure 2. The different degrees of shading are intended to give a rough idea of what is stretched how much.
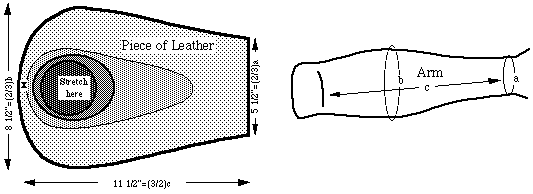 Figure 2
One way is to use a medium sized bowl-say 6"-8" in diameter. Put the bowl upside down on a convenient counter and stretch the leather over it by hand. Another way is to use two bowls, one a little larger than the other, with the leather in between.
When the leather has been stretched enough, the next step is to tie it to the form. The form should be something about the size and shape the bazuband is going to be. That means that it should be cylindrical for eight inches or so, with a diameter of about four or five inches and an end that is roughly spherical-increase the numbers a little if you are a giant.
I happen to have a steel bazuband the right size, so I cover it with Saran Wrap to protect it from the wet leather and use it as my form. If you do not have any antique armor lying around, look on the shelf where you keep empty jars, wine bottles, and the like; you should be able to find something about the right size and shape. It does not have to be exact; you will be able to do a certain amount of reshaping of the damp leather after you take it off the form. If you are really ambitious and good at whittling, you could probably make a wooden form and use it to make bazubands for everyone in your group.
Tie the wet leather onto the form, using strips of cloth to avoid marking the leather. Better yet, use a roller bandage-one of those elastic bandages they sell to tie up a sprain, made out of stuff that sticks to itself. You probably have one left around from the time you sprained your ankle fighting.
The basic idea is to get the wet leather tied tightly onto the form, so that when it dries it will have the shape of the form. The only hard part is the spherical section covering the elbow. Work that onto the corresponding part of the form by hand, trying to get it as smooth and wrinkle free as possible. I generally leave it for fifteen or twenty minutes, in the hope that it will stretch a bit more, then untie that part and try again. When you are finally satisfied, leave it for a few hours to dry.
At that point the leather should be stiff enough to hold its shape as long as you treat it gently; take it off the form so the inside as well as the outside can dry. If necessary reshape it a bit-open up the cylinder that goes over your forearm if it is too tight, or close it a little if it is too loose. Then leave it somewhere out of the way to finish drying. Do not start the next step until the leather is thoroughly dry, which probably means waiting several days; if you try to harden leather that is still a little damp, horrible things will happen to it.
Leather is hardened by impregnating it with beeswax. Some people do this by melting wax in a large pot and putting in the leather. This method requires a lot of wax, and I have never tried it. I harden my leather in the oven, using a large pan or a sheet of aluminum foil. In the pan I put the bazuband, with the hollow side up and a large chunk-half a pound or so-of beeswax inside it. Then I put the pan, leather, and wax in an oven set at about 220deg. .
When the leather is hot and the wax beginning to soften a little, take the pan out, rub the wax all over the surface of the leather, and put the pan (and wax and bazuband) back in the oven. Try not to spill wax anywhere where it is likely to catch fire. Continue the process for half an hour or more, rubbing wax on both sides, letting chunks of softened wax melt in the hollow part of the bazuband and running the melted wax around the inside, until the leather is soaked through with wax. Then turn off the oven and take out the pan, bazuband, and what is left of the wax. As long as the leather is hot the bazuband is reasonably flexible, so do any last minute reshaping to get the size just right, then let it cool and harden.
This is a simple bazuband, made of only one piece of leather, so all that remains to do is to punch holes in it (as shown in Figure 1), run a leather thong through the holes, and put in whatever kind of padding you prefer. You are done. You now have light, strong, rustproof protection for your sword arm and elbow. It is a beautiful brown color and looks (and is) very real.
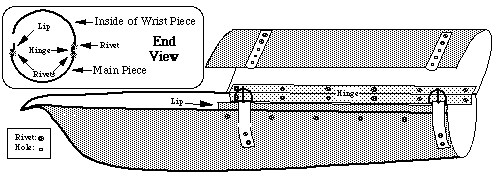 Figure 3
If you wanted a somewhat fancier bazuband, you could make a second piece to cover the inside of your wrist, as shown on Figure 3. The hinge is simply a strip of unhardened leather, rivetted to both pieces as shown. The side of the main piece that does not attach to the hinge has a lip for the wrist piece to fit over. It is simply a long rectangle of hardened leather, rivetted to the main piece as shown. The bazuband is held closed by two buckles. The figure includes an end view of the piece, seen from the wrist end, showing how the hinge, the lip, the main piece and the piece for the inside of the wrist go together.
In addition to covering the inside of the wrist, the bazuband shown in Figure 3 is fancier in another respect as well. The tip of the part that covers the elbow has a reverse curve, to make it more comfortable-that way there is no edge pressing against your arm just above the elbow. Some bazubands were made this way, some were not. Figure 4 shows one where the design has been modified to provide a little more protection to the sides of the elbow.
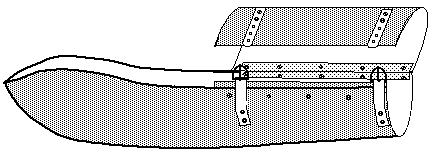 Figure 4
Obviously, there is lots of room for varying the details of the design to fit your taste and body. One of my bazubands currently has two extra holes in it near the elbow end, so that part of the lacing comes across the bend at the inside of my elbow; I think I like it better that way but am not quite sure. You can use buckles and straps instead of lacing. If you usually fight with a basket hilt, you can extend the bazuband at the wrist end a little, to provide a flap that covers the back of your hand and improves your wrist protection, like a half gauntlet.
What has your bazuband cost you to make? Where I live, the local leather stores sell scrap vegetable tanned leather, usually about 8 ounce, for $3 a pound-apparently leftovers from making belts. Sometimes they have pieces suitable for something like a bazuband, sometimes not. For leather that is not scrap the price is usually given in dollars per square foot, but works out to about $6 a pound. If your arm is the same size as mine, the piece of leather shown in Figure 1 is about two-thirds of a square foot; allowing for wastage, you will probably have to buy about one square foot. If you are using 12 ounce leather, that will weigh 12 ounces and cost under $3 if you can find it as scrap, under $6 otherwise. Add another dollar or two for the wax and you have a very nice piece of armor for less than eight dollars worth of materials.
After you have been using the bazuband for a few months, and blocking far too many blows with your swordarm instead of your shield, you may find that the leather has gotten a little soft in places and the color has gotten lighter. The solution is simple; put it back in the oven-provided, of course, that your padding is either ovenproof or removable. Ten or fifteen minutes in a 200deg. oven will remelt the wax, reharden the leather, and restore its original color. If it has been badly beaten, you might want to rub in a little more wax.
I have described the making of a particular piece of armor, but the same techniques can be used for other pieces. My greaves are essentially oversized bazubands (with a second piece covering the calf, like the wrist piece in the fancier version). Once I have gotten the knee part adequately stretched, I use my leg for the form to get the rest of the greave to shape. I have to hobble around for an hour or two with my leg wrapped in leather and roller bandage-but the final result is a greave molded exactly to the shape of my leg, like ancient Greek armor.
One problem I have occasionally had in making such armor is that the spherical parts come out not quite spherical enough; I have not stretched the leather sufficiently, with the result that my knee or elbow does not go quite far enough in to be adequately protected. There is a solution to this problem. Leather can be worked with a hammer on an anvil, much as steel is worked. The essential idea is to stretch the leather, before or after hardening, by hammering it against a hard surface. For details, consult a friendly armorer. An alternative way of solving the problem might be to make a two or three inch cut starting at the point marked X on Figure 2, overlap the edges of the cut, and rivet or sew the cut closed; I haven't tried that, but it seems like one obvious way of getting the hollow deeper.
To Make a Klibanion
Lamellar armor is made from lots of small plates of some rigid material, such as metal or leather, laced together. It was used by many different peoples, from Scandinavia to Japan. I call the piece I am describing a klibanion because that is a particular kind of lamellar armor for which I happen to have a name, but similar armor was used by many different people. Making lamellar armor is a project I have been thinking of for years but only got around to doing recently, while writing this article.
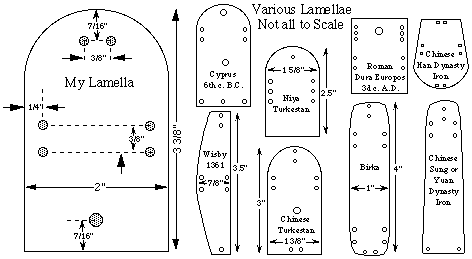 Figure 5
The first step is to cut out lots of lamellae. Figure 5 shows the size and shape I used, as well as several other shapes based on surviving lamellae (from Thordeman and Robinson). The material I used was 8 ounce vegetable tanned leather. A sleeveless lamellar vest, protecting me from the waist up, required about 180 lamellae.
The next step is to harden the leather. Since the pieces are flat, you can simply stack them in a cake pan or something similar, put a big lump of beeswax on top, stick them in a 220deg. oven and let the wax melt. When it is mostly or entirely melted, turn the pieces over, rearrange, and generally fiddle with them until every piece is saturated with wax. Then take them out and let them cool.
The next step is to put in the holes. You could do this with a leather punch, but I think it is easier to use a drill, especially if you have access to a drill press. Mark out the positions of the holes on one lamella, put it on top of a stack of five or ten others, make sure they are all aligned, and drill a hole through the whole stack. Put a nail or something similar into the hole to make it harder for the lamellae to shift around, then drill a second hole. Put another nail in that hole, then drill the rest; two nails will keep the lamellae pretty well aligned. Make sure you are drilling straight down, so the holes are in the same position in all the pieces.
Figure 6 shows a group of nine lamellae laced together and a diagram of the lacing pattern I use; it is slightly modified from a reconstruction by Bengt Thordeman described in Byzantine Armies 886-1118. I use leather thong for lacing. I lace the lamellae together into long horizontal strips, then lace the strips together. The lamellae in each strip overlap over those in the strip above, so the overlap is upward-just the opposite of scale armor, which overlaps down.
 Figure 6
Figure 7 shows my klibanion, laid out flat. It fastens at the right front. I have no evidence on how historical ones fastened; I did it that way because it required fewer fastenings than fastening it up the front. The next one I make will fasten up the front; that will require one more buckle, but make it easier to get it over my head. The figure does not show the join between the back and front part of the shoulder straps (also made of lamellae), since with the shoulder straps assembled the piece no longer lies flat. When the klibanion is completely finished, points a,b on the back shoulder piece lace to points A, B on the front ones and lamellae c-ftouch lamellae C-F. The front of the klibanion has an extra row of partial lamellae at the bottom, cut to fit the curve of the body-this is a feature you can see on the period pictures.
I have not shown how the armor fastens together. The simplest way is to take a foot or so of leather thong, tie a knot in one end, run it into one of the empty edge holes of lamella C, through the matching hole in lamella c, back out through the other hole in c and finally back to front through the matching hole in C, then tie a knot in the other end. If you pull it tight and tie it the thong holds the two lamellae together as if they were laced. Repeat for D, E, and F. Untying the thongs (but not pulling them out of the lamellae they are laced through) lets you separate the two edges (c-f and C-F) by enough to put the garment on. For a more convenient fastening, use buckles. The straps that the buckles are on lace to the lamellae at one side of the gap, the straps that go into the buckles lace to the lamellae at the other side. You may want to add enough extra lamellae so that the two sides can overlap a little.
 Figure 7
My current klibanion has a yoke of unhardened leather that fits over my shoulders, with a hole for my head and a slit in front. The lamellae on the shoulder lace down to the yoke. My shoulders and upper arms are protected by pteruges ("feathers"-long rectangular pieces) of unhardened leather. The yoke and pteruges are also shown on Figure 7.
Alternatively, one could make a lamellar flap to protect the shoulder, a feature of both Japanese and Persian lamellar armor. A larger flap, possibly 3 rows of 11 lamellae each, could be hung from the back of the waist to protect the buttocks. Another alternative would be more pteruges, hanging down from the bottom edge of the klibanion to protect the upper thighs-I believe that is the way the real Byzantine klibanions were often constructed. Yet another possibility, and one I may try for my next project, is a longer coat of lamellar, coming down to mid thigh and split front and back to permit better leg movement.
After the klibanion is assembled, there is one final step. Put it back in the oven at about 200deg. . Then put on your gambeson-or whatever else you plan to wear under the armor. When the armor gets limp, which should only take five minutes or so, take it out and put it on, being careful not to burn yourself. Wrap several strips of cloth around your body over the armor, forcing the lamellae flat against you; make sure there is at least one strip over each row of lamellae. Let the armor cool and harden, then take it off. You now have a klibanion custom fitted to your body. If the whole piece won't fit in your oven, do this step a little earlier, when you have almost but not quite finished lacing the lamellae together, so that the armor is still in two or three separate pieces.
Once you have shaped the armor to your body, you do not want to reshape it to something else. I have been told that a closed car in the sun can get hot enough to soften waxed leather; although I have never had it happen, it is probably worth taking care not to leave your courbouilli anywhere very hot. Of course, if you forget, you can always put it back in the oven and reshape it. I have also been told that courbouilli armor can soften somewhat if you fight in it in very hot weather. My current view on the subject is that if it is too hot out for my armor it is also too hot for me.
What will it take to make your klibanion? The one illustrated contains about 180 lamellae with a total area of about nine square feet, so you will need about four and a half pounds of eight ounce leather-more if you use something thicker. You will also need about two pounds of beeswax and ninety feet of lacing.
If you can get suitable scrap leather for $3 a pound, your total cost for leather, wax, and lacing should come to under $25, otherwise to under $50-somewhat more if you choose to use something heavier than eight ounce leather. Once you have figured out what you are doing, it should take about a minute per lamella to cut them out, about another minute to harden and drill them, and less than a minute per lamella to lace them, so you should be able to make your second klibanion in about eight to ten hours of work-the first will take longer. The lacing, incidentally, provides those of us who do not knit something to do with our hands while conversing with friends or watching small children.
The finished piece protects my torso from the waist up and weighs about six pounds. I am 5'3" tall with a 36" waist; if you are substantially bigger or smaller, scale the figures accordingly. Nine square feet of lamellae comes to about four and a half square feet of armor, so I am covered, on average, by two layers of 8 ounce hardened leather. I believe that that, over a reasonable gambeson, should satisfy the armor requirements of any kingdom, but check with your local marshall to make sure.
Whether or not it is legal, is it adequate protection? That depends on what sort of fighting you do. For the average sword and shield fighter doing mostly single combat, I think the answer is yes. The klibanion is light and easy to move in, and it protects you reasonably well against the occasional shot that gets through to your body-although you will want to add additional protection for your torso below your waist and for your shoulders.
On the other hand, if you often take hard body blows-for instance, if you fight bastard sword or two sword, or get involved in a lot of very messy melees-you probably want substantially more protection for your body. One way to get it would be to use thicker leather, perhaps 12 or 13 ounce or more, at least for the most important parts of the armor, which probably means the sides. Another is to use steel lamellae for some parts of the armor. That takes more time and more tools, but it gives you armor combining most of the protection of steel with most of the lightness of leather. I have tried both of these. My current klibanion has steel lamellae alternating with hardened leather on one side and thick hardened leather lamellae on the other-both seem to work fine. Another alternative that I have not tried is to move the holes in the lamellae farther in from the edge, in order to increase the amount of overlap.
This is a very simple klibanion. The ones shown in Byzantine pictures provided more coverage of the upper body and shoulders, and often had additional pieces of leather (pteruges) hanging down from the waist to protect the tops of the legs.
Size and shape of surviving lamellae vary over a wide range; you may want to experiment. My first klibanion used rectangular lamellae 3"x5". It was less work to make than the one I have shown and provided about the same protection, although slightly less flexibility. None of the pictures I have seen show lamellae that big, which is the main reason I used smaller ones for my second try. One of my squires has made a klibanion using lamellae similar to mine, but about an inch wider. It was less work to make, since it required fewer lamellae, and it probably provides slightly better protection; my next one will use a similar pattern.
You should also feel free to use your own inspiration, guided, where practical, by pictures of period lamellar armor, in varying the design. One of the nice things about lamellar is that when you decide you need a little less under the arm and a little more over the shoulder, all you have to do is move a few lamellae. Try doing that with a steel breastplate.
A Gauntlet
Figure 8 shows a hardened leather gauntlet, both the cut out pieces and the whole thing shaped and assembled. It is made of four pieces of hardened leather (I recommend at least 14 oz) plus a hinge of unhardened leather (7 oz). The hinge U is laced to the finger piece S along ff (which laces to FF), to the hand piece R along gg (which laces to GG) and to the knuckle piece T along ee (which laces to EE). The base of the thumb piece overlaps the hand piece R, and is fastened by a piece of leather thong, going through one hole at the base of Q and two holes in R. The edges cc and dd, which touch when the gauntlet is assembled, are bevelled at the bottom (the inside of the gauntlet), to help the gauntlet bend better.
The hard part, of course, is shaping the wet leather. The simplest way is to use a steel mitten gauntlet of about the right shape as your form. If that is not available, look for common household objects with the right shapes. The finger piece S, for example, must curve down (to protect the sides and tips of the fingers) everywhere except along cc, where it touches the hand piece R. You can get this shape by molding it into the bottom of a shallow bowl, with cc running roughly through the center of the bottom-that way the other three sides curve up, but cc does not. When you think you have it about right, take it out and do the final shaping by hand.
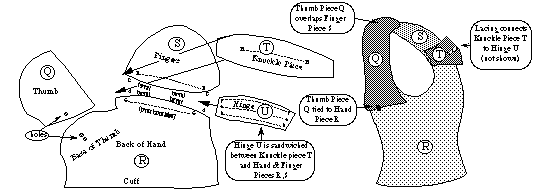 Figure 8
The hand piece R should end up with a sort of hourglass shape, with the cuff flaring out from the wrist. To get this put the narrow end of a fairly large funnel into the mouth of a jar, and tie them together. Then tie the wet leather over the resulting hourglass shaped form.
Complete instructions for something as complicated as a gauntlet would require a much longer discussion, a much better artist, and much more precise drawings. This should, however, give you enough information to get started on your own process of trial and error. If you do it right, you should end up with a gauntlet that entirely bridges the hand and thumb, so that the force of a blow to the hand is transmitted to your sword, not your hand.
Other Possibilities
There are lots of other things you can make out of hardened leather. My upper legs, for instance, are protected by armored underpants-loose drawstring pants with pockets holding long pieces of hardened leather. My gorget is hardened leather, and one of our new people has been making himself hardened leather copies of a simple steel elbow cop, using two thicknesses of eight ounce leather. Another member of our group made a hardened leather basket hilt; Figure 9 shows his design. I would recommend using at least 14 oz leather. One could easily enough make a Visby coat of plates or a backplate and breastplate combination, although I have not yet done either. And, of course, there is always the hardened leather hockey cup-for which I recommend very thick leather.
Rawhide
So far I have been discussing courbouilli -hardened leather. Another material worth trying is rawhide. Unfortunately, it is more difficult to get-the maximum thickness sold by the only commercial sources I have located so far is about 4 or 5 ounces, too light for armor.
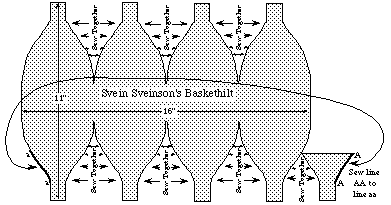 Figure 9
One solution is to make your own; I have not tried that, although I know someone who has. Fortunately, one of the members of our group knows someone who makes drum heads, and was able to get a lot of scrap rawhide from him for me to experiment with. My conclusions so far are fairly tentative, since I have made a few things but not yet fought with them.
The rawhide I have been working with is about 1/8" thick when dry; I believe this is the full thickness of the hide, so unless you have a source for rawhide from a rhinoceros, it is probably about as thick as you can get. It is both very hard and very tough--substantially stronger than 8 ounce hardened leather. It can be cut with a saw, or soaked for a few hours to soften it and then cut with a knife. While wet it can be stretched--the best way seems to be to punch holes in the edges of the piece, and then use laces to pull it tightly over the form. I made a dhal, a small buckler, by stretching the rawhide over a bowl.
One advantage--or perhaps disadvantage--of rawhide is that it can be dyed. My Irish squire has been planning a patchwork klibanion, which should be interesting. One problem with rawhide is that when it gets wet it gets soft. I have visions of putting a klibanion into an armor bag along with a very sweaty gambeson, and a week later pulling out a large rawhide pretzel. My solution to this problem is to wax the rawhide, just as I would wax leather. Waxed rawhide is no harder than unwaxed rawhide--but it seems to be waterproof.
Tools and Materials
The only expensive tool you will need for making hardened leather armor is one you already have-an oven. A utility knife costs about $3 and does an adequate job of cutting leather. For cutting lamellae, a large metal ruler is useful, and even more useful if it is a right angle ruler. You will want a piece of scrap plywood or linoleum to cut the leather on--utility knives mark up cutting boards pretty badly. Aside from strips of rags, an empty wine bottle to use as a form for your bazuband, a 2" diameter lid from a baby food jar to put on the lamella and cut along in order to cut the rounded end, and a few similar odds and ends, that is it.
To find local sources for leather, look in the Business to Business Yellow Pages under leather, tanners, and shoe making supplies. The Leather Factory is a chain with stores in many states; I have found their prices somewhat better than Tandy's. Currently, a 20-22 sq. ft. hide of commercial grade saddle skirting, 13-15 ounce thickness, is about $80 (plus postage) on sale, $110 otherwise. Beeswax is sometimes available from health food stores, or from places that sell leather. It can be purchased by mail from Glorybee Bee Supply store (1-800-GLORYBE). Their price, as of November 1991, was $1.95/pound plus postage in quantities of ten pounds or more, and $2.95 a pound plus postage for smaller quantities.
A Historical Note
In describing hardened leather armor at the beginning of this article, I said that, in addition to all of its other virtues, it is also period. I should qualify that by saying that although hardened leather was used as armor in period, I do not know the details of how it was hardened. I should also add that although the bazuband is a period piece of armor--it appears in pictures from the eighth century and is common in late period Persian art (see Robinson and Elgood)--the surviving ones that I know of are made of metal. They could have been made of hardened leather and I think it likely that some were, but I cannot prove it.
References
Robert Elgood, ed., Islamic Arms and Armor, Scolar Press: London 1979.
Ian Heath, Byzantine Armies 886-1118, Colour plates by Angus McBride, Osprey Men-at-arms Series 89, Osprey Publishing, London 1979.
H. R. Robinson, Oriental Armor, London, 1967.
Thordeman, Armour From the Battle of Wisby.
Webbed by Gregory Blount of Isenfir Illustration conversion help from rinman@ucsd.edu.